Project Lombok ~ No more Boilerplate Code

What Is Project Lombok?
Project Lombok is a Java library that aims to eliminate boilerplate code and improve code readability and maintainability. Java has been in existence for a long time, and one of the major setbacks of Java is the very long lines of code also known as boilerplate codes, this issue makes Java language a tough one to comprehend and thus makes Java a not-too-friendly programming language. For this reason, Project Lombok was built to eliminate the boilerplate codes in Java.
How to Download, Enable and Install Lombok in IDE
In this article, I will show you 3 ways how to plug project Lombok into your Java projects. But first, you will have to download Lombok.
Download on your Eclipse/STS, you can manually add Project Lombok by downloading Project Lombok from the official site.
Enable Lombok in your Eclipse/STS IDE by right-clicking on your project >> click on properties >> Java Compiler >> Annotation Processing and check "Enable project-specific settings" and "Enable annotation processing." Apply and Close.
Note: If you have to verify if Project Lombok is installed on your IDE, Click "Help" >> Depending on your IDE(I'm using STS4) click on "About Spring tool suite 4" You will see Project Lombok installed. See the image below.

3 . After installing and enabling Lombok in the IDE, the next step is to add Lombok to our project classpath or pom.xml file.
Installing Lombok Manually to Classpath
We have multiple ways of adding Lombok to our project classpath. we can add it manually by adding it directly to the classpath of the Java project like this. First, we create a Java Project and add a class that holds data fields. i.e. (id, first name, last name, country).In this class, we will add @Getter and @Setter.
see the image below.

As we can see in the image above, we have 34 lines of code for creating getters and setters for 4 fields of data only. Now this is where Lombok comes in, we can cut down the lines of codes and still have our getters and setters at hand. Magic right?... To implements that we just need to manually add the Lombok project to the build path. To do we just have to right-click on our project and select build path>>configure build path >>Libraries>> and select Add external jars, it will take us to the local directory where we can select the downloaded Lombok jar file, click apply and close. we will see that Lombok has been added to a reference library.
After we successfully added Lombok to our project, we can add the necessary annotations to replace the boilerplate code. Lombok comes with different annotations.
@Getterand@Setter: It generates getter and setter methods for class fields.@ToString: it generates atoString()method implementation for the class@EqualsAndHashCode: it generatesequals()andhashCode()methods based on the class fields.@NoArgsConstructor,@RequiredArgsConstructor, and@AllArgsConstructor: it generates constructors with no arguments, required arguments, or all arguments, respectively.@Data: Combines@ToString,@EqualsAndHashCode,@Getter, and@Setterfor a class.@Builder: Provides a builder pattern implementation for the class.
We can use different annotations as we desire, For this article, I will be using the @Dataannotation for illustration. see the results of using @Data annotation below.

It looks like magic, right? 34 lines of codes shrank to 10 lines of codes After adding the @Data annotation to the entity class generates all @Getter,@Setter,@ToString, @EqualsAndHashCode. without writing boilerplate codes. In the right-hand column in the outline, we can see the @Getter,@Setter,@ToString, @EqualsAndHashCode. outlined.
Installing Lombok Using Maven
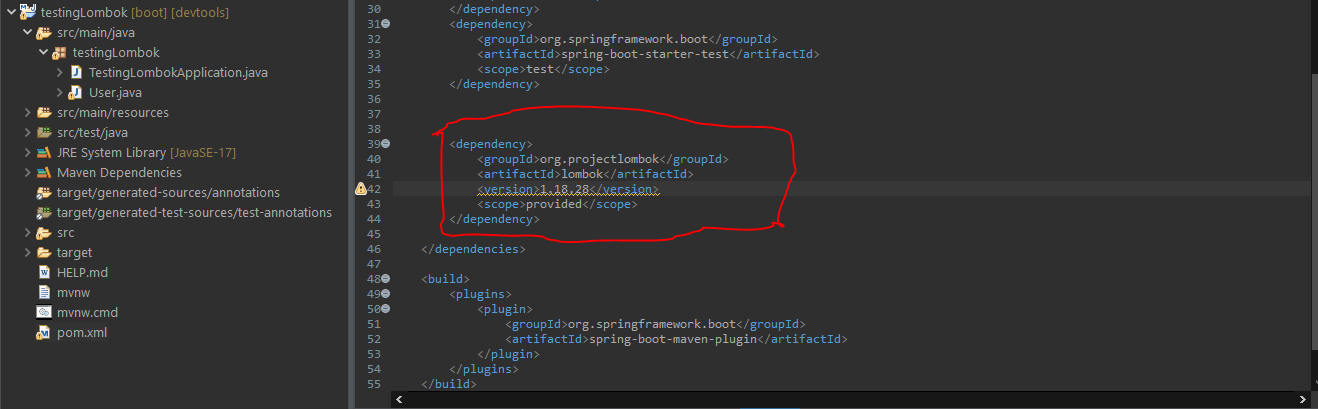
Another way we can add the Lombok project to our classpath is to use Maven. it is a straightforward way of adding Lombok if only our projects are built on Maven. Adding Lombok dependency also requires downloading, installing, and enabling Lombok in our various IDE. follow the first paragraph on how to download, install and enable Lombok in our IDE. After enabling Lombok, we need to add this dependency in the pom.xml file.
        <dependency>
            <groupId>org.projectlombok</groupId>
            <artifactId>lombok</artifactId>
            <version>1.18.26</version>
            <scope>provided</scope>
        </dependency>
Now that we have added Lombok dependency in our project, we can test to see if our User class will generate a getter and setter by adding @Data annotation to the class. see the image below.
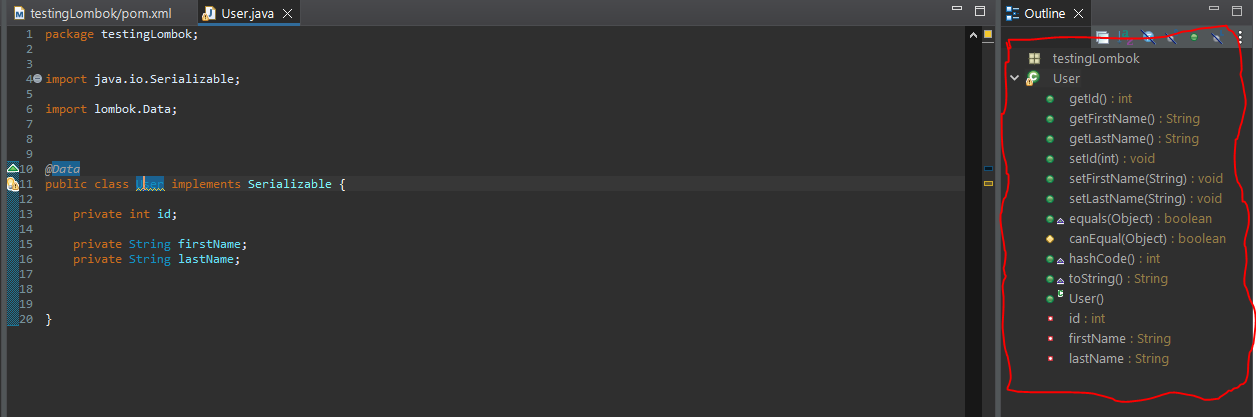
Perfect right? The outline shows the @Getter,@Setter,@ToString, @EqualsAndHashCode. The @Data annotation generated the necessary methods.
Installing Lombok Using Gradle
We can as well follow the same step of downloading, installing, and enabling Lombok in our IDE if we want to use Gradle, Follow the steps in installing manually in the first paragraph. After enabling Lombok, we need to add this dependency in the build. gradle file.
implementation 'org.projectlombok:lombok:1.18.20'
Conclusion
Boilerplate codes in Java can be cumbersome to maintain, project Lombok has provided many ways to eliminate boilerplate codes by using the appropriate annotation to address a class. The most ways of implementing the Lombok project are through maven, gradle or manually adding the jar file to the classpath of our project.


![The Application Failed to Start Error in Springboot [SOLVED]](/_next/image?url=https%3A%2F%2Fcdn.hashnode.com%2Fres%2Fhashnode%2Fimage%2Fupload%2Fv1686163363381%2Fbd454b9f-a28e-42c5-8bd8-0c5a9e0cf021.png&w=3840&q=75)